
Landing at Anzac Cove
Encyclopedia
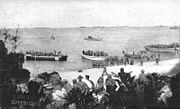
The landing at Anzac Cove was part of the amphibious
invasion of the Gallipoli Peninsula by Australian and New Zealand forces on 25 April 1915. The landing, north of Gaba Tepe on the Aegean
coast of the Peninsula, was made by soldiers of the Australian and New Zealand Army Corps and was the first significant combat of the war for these two countries. Another landing
was made several miles to the south west at Cape Helles by British and French troops.
The purpose of the invasion was to overtake the Ottoman forts that controlled the passage of the Dardanelles
straits. The Anzac Cove landing went awry when those members of the leadership cadre with the knowledge of the operational plan were either killed or evacuated wounded leaving the organisation at the beachhead in chaos and so, what was planned as a swift operation became a protracted and bloody eight-month struggle. In that period the frontline of the Anzac battlefield remained little changed from the ground captured on the first day of the landing, a space less than three-quarters of a square mile (2 km²) in size—home to over 20,000 men.
Winning control of the Dardanelles was originally intended to be a purely naval operation but after the loss of three battleship
s during the attack of 18 March it was decided that the aid of the army would be required to defeat the forts that guarded the straits. See Naval operations in the Dardanelles Campaign
.
The Mediterranean Expeditionary Force
was formed under General Sir Ian Hamilton
and a two-pronged landing on the peninsula was planned. The British 29th Division
would carry out the main landing at Cape Helles
on the tip of the peninsula and advance along its length towards the forts at Kilitbahir which controlled the passage of the Narrows of the Dardanelles.
However, because it was not possible to land the entire force on the limited beaches at Helles, a secondary landing by the Australian (and) New Zealand Army Corps, north of Gaba Tepe on the Aegean coast, was planned. If resistance was strong, this secondary landing would be treated as a feint to draw defenders from Helles and the attacking force would be withdrawn. If successful, the attacking force would be a mere five miles (8 km) from the Narrows and in command of the high ground thereby denying the passage of reinforcements to Helles.
The Australian and New Zealand Army Corps (ANZAC) was formed in Egypt
from the Australia
n and New Zealand
infantry
that had been in training prior to moving to the Western Front
in France
. When the need for infantry at Gallipoli arose, they were ideally placed to participate. Two divisions were formed; the Australian 1st Division containing the 1st, 2nd and 3rd Brigades, and the New Zealand and Australian Division
containing the Australian 4th Brigade and the New Zealand Infantry Brigade.
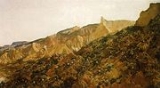
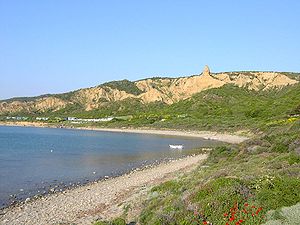
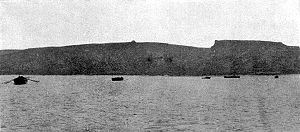
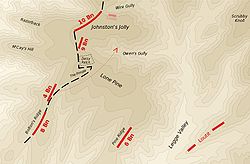
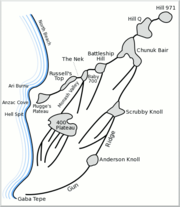 The terrain behind the planned landing site was rough, thinly wooded and covered with scrub. The main ridge line, the Kocaçimentepe Range (mistakenly called the Sari Bair Range by the British), ran along the length of the peninsula behind the landing area. There was little flat ground; the area was dominated by a series of ridges and eroded gullies or ravines. The peak of Hill 971 (Kocaçimentepe) was the highest point on the peninsula. Anzac Cove
itself is a shallow, nondescript stretch of beach about one kilometre wide, bounded by the headlands of Ari Burnu to the north and Hell Spit to the south.
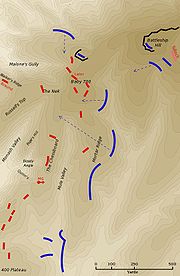
The British planners identified three ridge lines as objectives for the invasion. The first ridge started above Ari Burnu at Plugge's Plateau (named later for Colonel A. Plugge of the Auckland
Battalion). The ridge continued via a perilously narrow stretch known as the "Razor's Edge" to a plateau called Russell's Top. A number of lesser spurs projected from Russell's Top towards the beach; the most prominent was a striking, eroded outcrop that was inevitably named "The Sphinx
" by soldiers who had until recently been encamped near the Pyramids of Giza. Neighbouring it to the north was Walker's Ridge which provided a direct, if exposed, route to the Top from the beach. Russell's Top was connected to the main range at Baby 700 via a narrow saddle known as "The Nek
". Baby 700 was so named because it and its neighbouring hill, Big 700 (later known as Battleship Hill), lay within the 600 feet (182.9 m) contour on the British maps. (Baby 700 is actually 590 feet (179.8 m) in height.)
 The second ridge also connected to the main range at Baby 700. Between the first and second ridges lay "Monash Valley" named after General John Monash
. On the second ridge was one of the largest regions of level ground known as 400 Plateau (as it was bounded by the 400 feet (121.9 m) contour). It was a wide, heart
-shaped area of relatively level ground, thickly covered with scrub but largely treeless. The northern "lobe" of the plateau became known as "Johnston's Jolly", after Colonel Johnston, commander of the divisional artillery, who positioned guns opposite it with which, in the vernacular of the day, he could "jolly up" the Ottomans on the plateau. The southern "lobe" was distinguished by a solitary Turkish Pine
tree, initially named the "Lonesome Pine", after a popular song of the time, but afterward shortened to Lone Pine
. From this plateau, a number of lesser ridges projected towards the beach north of Gaba Tepe. The seaward ridge was Bolton's Ridge, the inland ridge, Pine Ridge.
The third ridge, known to the Anzacs as "Gun Ridge" and the Ottomans as Topçuluk Sirt (Artillery Ridge), because of some artillery
emplacements that were located there, stretched from Gaba Tepe to the main range at Chunuk Bair, above Battleship Hill. Between the second and third ridges lay Legge Valley.
 The ANZAC landing area was a broad, four mile (6 km) stretch of beach from about a mile (1.6 km) north of Gaba Tepe to a point near Fisherman's Hut, north of Anzac Cove. It was officially designated "Z Beach". (The five landing beaches at Helles were designated "S", "V", "W", "X" and "Y Beach"). To attain surprise the landing would commence following moonset, about one hour before dawn.
The landing would begin with the arrival of a "covering" force to swiftly capture the area surrounding the landing zone and make it secure for the main force. The Australian 3rd Brigade
was selected as the covering force. Three battalion
s were to seize the third ridge line as well as Gaba Tepe while the fourth battalion remained in reserve. Following the covering force, the Australian 2nd Brigade would land and move to the north, climbing to the summit of the main range at Hill 971 and protecting the left flank of the landing. The original plan called for the capture of Mal Tepe, halfway across the peninsula, on the first day but only if the landing was successful would this objective be pursued by the main force; the Australian 1st Brigade and the two brigades of the New Zealand and Australian Division.
The first wave of the covering force would come ashore from the cutters of three battleship
s which were to approach within three miles (5 km) of the shore. The remaining waves of the covering force would be landed from seven destroyer
s which were to approach close in to the beach. The main force would land from transports.
 As the armada of Allied ships draw nearer, by 2.00 am it was spotted by various Ottoman observers who passed the information on to Maidos HQ. The 2nd Battalion of the 27th Infantry Regiment was ordered to be on the alert prepare for action to repel any troops landing on the shores.
and 11th Battalions
of the Australian 3rd Brigade
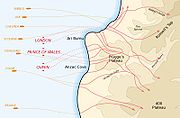
. The companies embarked from three Formidable-class
battleships; HMS Queen
, HMS London
and HMS Prince of Wales
. Each battleship dispatched four steamboats towing three row boats (launches and pinnaces)—a total of 48 boats.
The moon set at 3am and the battleships released the tows at 3.30am. Given the night was pitch dark, the tows headed due east and so relied on the battleships having been in the correct position when they were released. The journey of the tows became a shambles and numerous theories have been proposed to explain what went amiss. The southern-most tow kept a good course and was aimed correctly just north of Gaba Tepe but its commander found the neighbouring tows were heading northwards, leaving him isolated. He altered course to bring his tow closer and this may have caused a ripple effect as the other tows responded with a similar correction. As the shore was sighted, the headland of Ari Burnu became visible and some tows mistook this for Gaba Tepe and hence veered even further north.
For whatever reason, these first boats which were meant to land on a two mile (6 km) front between Hell Spit and Gaba Tepe ended up concentrated about Ari Burnu, 1.5 miles (2.4 km) north of their intended landing area—in fact, in the landing area of the 2nd Brigade which was to follow. The area about Ari Burnu was defended by a single company of the 2nd Battalion, 27th Regiment, Ottoman 9th Division. The Australians began to come ashore at 4.30am, the first man to land was Cpl. Joseph Stratford #1179. 9th Btn. According to eyewitness reports, when he was waist deep in water, he disposed of most of his heavy equipment and charged towards the enemy, which cut him down in a hail of bullets.
The first troops to land were met by sporadic rifle and machine gun
fire but casualties were relatively light. The 11th Battalion, which had landed just north of Ari Burnu, suffered the worst. The main enemy was confusion. The erratic course of the tows meant that the units had become intermingled. Officers were unsure where their units were or indeed where they themselves were; some thought that they had landed at Gaba Tepe. The geography was utterly unfamiliar and no objective could be identified.
Most of the troops of the 9th and 10th Battalions began to climb the first hill that confronted them, which unfortunately turned out to be the dead-end Plugge's Plateau.
 The second wave, comprising the second halve of the 9th, 10th and 11th as well as the complete 12th
Battalion (which was intended to be the brigade reserve), landed from seven destroyers; HMS Chelmer, HMS Colne
, HMS Ribble, HMS Usk, HMS Foxhound, HMS Scourge and HMS Beagle. The destroyers had begun to move in at 4am and approached to within 500 metres of the shore before unloading their cargo into their boats. They too had moved too far to the north but were in places closer to the planned landing area—the Beagle unloaded south of Hell Spit on the intended beach, far enough south in fact that she came under machine gun fire from Gaba Tepe. The relatively short distance to travel meant that the battalions tended to land in the correct order and not become mixed as had happened with the first companies to land, however, with the element of surprise gone, the second wave was under constant fire.
Those units that did land to the south of the first wave's landing at Ari Burnu were confronted by gentler terrain than Plugge's Plateau and so, despite coming ashore 20 minutes after the first wave, they tended to make faster progress inland towards the second ridge. As was the case with the first wave, those of the second who landed north of Ari Burnu encountered heavy fire and suffered casualties both in the boats and on the shore.
To the north, some parties avoided the bottleneck on Plugge's and reached the extension of the first ridge at Russell's Top. One party, under the command of Captain Tulloch of the 11th Battalion, had followed the beach to the north and then ascended Walker's Ridge. There they encountered other parties from the 12th Battalion, one under Captain Lalor, which had scaled the cliff faces between Plugge's and the Sphinx.
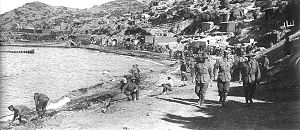
The remainder of the Australian 1st Division (the 1st and 2nd Brigades) began to land from the transports between 5.30am and 7.30am. Boats from the transport Galeka, bearing about 140 men of the 7th Battalion
, made the most northerly landing of the day, opposite Fisherman's Hut. They were met by a withering fusillade from the Ottoman defenders and less than 40 men made it to the beach. Over the next night and day numerous attempts were made to recover the wounded from the exposed boats.
. He believed the Gaba Tepe landing was a feint and that the main blow would fall at Bulair, where the peninsula joins the Ottoman mainland. The demonstration by the Royal Naval Division in the Gulf of Saros, opposite Bulair, reinforced this belief. Von Sanders therefore retained two divisions, the 5th and the 7th, at Bulair, leaving the 9th and 19th divisions to deal with the Anzac and Helles landings. The reaction of the commander of the 9th Division was to send the two remaining battalions of the 27th Regiment (1st and 3rd) to reinforce the 2nd. Mustafa Kemal, commander of the Ottoman 19th Division which was in reserve only a few miles from the landing, was instructed to send a single battalion as well.
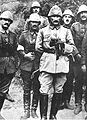 When reports reached Mustafa Kemal that the Australians were making for the peaks of Chunuk Bair and Hill 971, he was convinced the landing was not a feint and so, making a decision that probably doomed the Anzac landing to failure, if not defeat, he personally led the entire 57th Regiment forward to counter-attack, setting up his headquarters on the third ridge at Scrubby Knoll (understandably known to the Turks as Kemal Tepe — "Kemal's Hill"). Prior to committing the 57th Regiment, Mustafa Kemal issued his famous order, "I do not expect you to attack, I order you to die! In the time which passes until we die, other troops and commanders can take our place!" http://books.google.co.uk/books?id=XUlsP0YuI1AC&pg=PA76&dq=turkish+army+dardanelles&as_brr=3#PPA83,M1 He would later write that the 57th Regiment was "a famous regiment this, because it was completely wiped out." The remaining regiments of the 19th Division, the 72nd and 77th Regiments, would join the fight in the evening. Only two regiments, the 25th and 26th, were available to counter the British landing at Helles.
 As the morning progressed, the focus of the left flank of the landing became Baby 700 which was of immense importance as it commanded the junction of the two ridges and hence access from the landing area to the first significant peak of the main range at Chunuk Bair
. It also had a view straight down Monash Valley which was to become the main ANZAC base on the left.
Captain Tulloch led his force of about 60 men from Russell's Top across the Nek and, working around the inland side of Baby 700, began to drive the thin line of Ottoman defenders back up the ridge. Tulloch's small force managed to advance to a point just below the crest of Battleship Hill on the inland side. Here they were stopped by mounting Ottoman resistance to the front on Chunuk Bair and were threatened with outflanking from the seaward side of the hill. Tulloch therefore withdrew his force to Baby 700.
The Ottoman reinforcements had begun to arrive. The 1st Battalion of the 57th Regiment attacked along Mortar Ridge towards Baby 700 from the inland side. The 2nd Battalion had swung around behind Battleship Hill and advanced down the range on the seaward side of Baby 700.
Captain Lalor, aware that his 12th Battalion was meant to be in reserve and that the Nek was a vital defensive position, began to dig in on Russell's Top. At about 8.30am, having no sign of Tulloch's progress, Lalor decided to advance across the Nek onto Baby 700. The Australians took up positions on the far side of the summit and on the spur that led down towards the beach but were repeatedly forced to withdraw to the shelter of the near side. Five attempts were made to get across between 7.30am and 3pm.
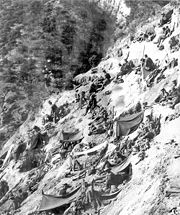
Shortly after the landing, the commander of the 3rd Brigade, Colonel
Sinclair-MacLagan, had begun directing his forces on Plugge's Plateau to move up Monash Valley. The first companies were ordered to form strong posts on the second ridge, along the eastern face of the valley which was cut by steep, eroded ravines. These posts, which hung precariously from the lip of the valley wall, would come to be known as "Courtney's", "Steele's" and "Quinn's" Posts. Other forces from Plugge's were sent via Monash Valley towards Baby 700 but as fighting developed at the posts along the valley wall, these troops were repeatedly drawn off as reinforcements. Consequently, few additional troops would arrive to support those on Russell's Top as they attempted to capture and hold Baby 700. Around 10am MacLagan obtained reinforcements from the newly arrived 1st Brigade; one company from the 1st Battalion and two from the 2nd Battalion. The Auckland
and Canterbury
Battalions of the New Zealand Infantry Brigade, under the temporary command of Brigadier General
H.B. Walker
, an ANZAC staff officer, were also directed to Baby 700.
As the Ottomans also continued to reinforce, the position on Baby 700 deteriorated and became more untenable for the Anzacs whose flanks were in the air. They lacked sufficient machine guns and artillery support was non-existent since all Australian artillery that landed was ordered back into the ships. At about 4pm, the Ottoman 57th Regiment, now with the 3rd Battalion in support, mounted a concerted counter-attack on Baby 700. With the aid of artillery fire, they broke through the Anzac line forcing them to abandon the hill. The survivors retreated across the Nek or into Malone's Gully (on the seaward side of the Nek) and Monash Valley (on the inland side). A few became lost and ended up in the valley on the far side of the second ridge (Mule Valley) and were captured or killed.
One party under the command of Colonel Braund of the Australian 2nd Battalion was holding a line near the top of Walker's Ridge but Russell's Top was thinly held. During the night of 25 April, a small force of Ottomans from the 3rd Battalion, 57th Regiment, succeeded in infiltrating the line at the Nek and advancing along the Top, effectively splitting the left and right flanks of the Anzac firing line. The Ottomans withdrew from the Top before dawn, possibly encouraged by a naval bombardment.
 The covering force attempted to carry out their orders, despite the disarray of the landing, and so, crossing 400 Plateau, small parties headed for the third ridge. However, the only groups to reach there were from the second wave which had avoided Plugge's. Two fast-moving scouts of the 10th Battalion made the deepest penetration when they reconnoitred Scrubby Knoll on the third ridge. Lieutenant Loutit of the 10th Battalion led 30 men to a spur of the knoll, just short of the third ridge. Like Tulloch on Battleship Hill, these men had fleeting views of the Narrows, three miles (5 km) away. However, a sizeable Ottoman force was amassing and, receiving few reinforcements, they were compelled to withdraw to the second ridge at 9.30am. They were pursued across the valley by the first Ottoman troops of the 3rd Battalion, 27th Regiment which began to counter-attack against the thin Australian firing line that was forming along the second ridge and across the plateau.
By this stage Colonel MacLagan had already decided to change the plan and hold a position on the second ridge. The 9th and 10th Battalions began to dig in across the plateau. His orders did not reach everyone. Isolated groups continued to push for the original objectives and were lost. As troops of the 2nd Brigade began to arrive, MacLagan made the fatal decision to advance the 9th Battalion, which had formed the semblance of a firing line across the middle of the plateau. By sections the Australians advanced and effectively vanished into the mounting Ottoman fire. MacLagan attempted to rescind the order shortly afterwards but by this time the battalion was dispersed. MacLagan convinced Colonel M'Cay
of the 2nd Brigade to send his battalions, which had landed in some kind of order, forward into the plateau's void as well.
The day's fighting on 400 Plateau was confused. The thick scrub meant that men lying prone were invisible but unsighted and so it was nearly impossible to maintain contact with adjacent units. When standing up to move, the men were visible to the Ottoman defenders on the surrounding hills, thereby summoning a hail of gunfire and shrapnel. Lacking coherent organisation, small bands would advance, either following the original orders to reach the third ridge or new orders to reinforce the "firing line", wherever that was. The outcome was inevitably the same; they became detached, lost, pinned down and reduced by casualties.
By 1pm some semblance of a line had been re-established on 400 Plateau but it was thin and discontinuous. The 2nd and 3rd Brigades had been fully committed and the 1st Brigade battalions were now being led in to the fight. At 4.45pm, threatened by a Ottoman counter-attack, General Bridges
, commander of the 1st Division, committed the last of the reserves, the 4th Battalion, on the plateau.
South of Lone Pine, the 8th Battalion had established a strong line on Bolton's Ridge which secured the southern flank of the landing. Major H.G. Bennett led 300 men of the 6th Battalion forward from Bolton's Ridge to Pine Ridge which extended south from Lone Pine and faced the third ridge across Legge Valley. Bennett was wounded in the wrist and forced to withdraw. When the Ottoman 27th Regiment counter-attacked around 17:00, the force Bennett had established on the Pine Ridge was surrounded and annihilated, the Ottomans taking no prisoners.
Near midnight, the men of the Australian Division received this blunt message from Birdwood: "Must organise entrenchments and hold on with all your might. Please complete entrenching scheme and link up fire trenches with those on right and left."
Dawn came and went on 26 April without a Ottoman attack. The Ottomans of the 9th and 19th Divisions were as exhausted as the Anzacs and had lost nearly as heavily in the first day's fighting. The fresh divisions with which an attack could have been made, the 5th and 7th Divisions, had been held at Bulair all day on the 25th.
The 26th was not without bloodshed for the Australians. In a tragic fiasco, the one battalion of the 1st Division that had survived the landing relatively unscathed, the 4th Battalion, made a general advance, marching north across 400 Plateau along no man's land
. They were cut to pieces crossing Lone Pine. A few reached Johnston's Jolly where they sought shelter. The exact reason for the disaster was never determined but it seems that the 4th Battalion, expecting the ANZAC advance to resume at any time, had followed a movement on their left when General Bridges had instructed troops on Lone Pine to straighten their line.
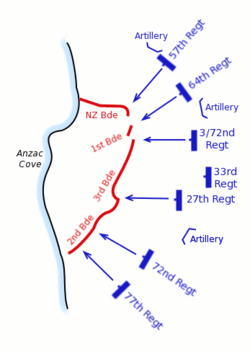 On 27 April, Mustafa Kemal had the troops he needed to launch his general counter-attack with the intention of driving the Anzacs into the sea. The attack was made on the entire Anzac perimeter, from Baby 700 in the north, along the second ridge, across 400 Plateau and down Bolton's Ridge to the beach. The critical situation at Helles meant that most Ottoman reserves were dispatched there however Mustafa Kemal had received the Ottoman 33rd and 64th Regiments and his 72nd Regiment was still largely intact. He counter-attacked with five regiments, keeping the 33rd in reserve, but poor communications meant that his battalions did not coordinate their movements.
At 2.30pm, the 57th Regiment attacked in six waves, advancing down Battleship Hill. In view of the British naval forces, the HMS Queen Elizabeth
put six 15-in shells amongst the Ottoman lines, scattering them and breaking the attack. The Ottomans resumed the attack at the Nek under the cover of darkness but were driven off by 10pm. The 3rd Battalion of the Ottoman 72nd Regiment attempted to attack across the Chessboard against Pope's Hill but were caught in enfilading fire from a small Australian outpost near Quinn's. Elsewhere the Ottomans were able to get close, but not break into, the Anzac posts along the second ridge. At 11am a large force had advanced across Lone Pine towards the Australian line but were driven off by noon. After nightfall a Ottoman attack was made against Bolton's Ridge but, aided by field artillery guns firing over open sights, the attackers were held off, despite getting to within 25 yards (22.9 m) of the Australian trenches. For the time being, the Anzac landing was safe.
 On 28 April the Anzacs were reinforced by the arrival of four battalions of the Royal Naval Division; the Chatham, Portsmouth
and Deal
Battalions of the Royal Marine Brigade and the Nelson Battalion of the 1st Royal Naval Brigade. These were sent in along the second ridge and 400 Plateau to relieve the Australian 1st and 3rd Brigades which had been under constant pressure since the landing. The relieved brigades attempted to reorganise on the beach.
Meanwhile Mustafa Kemal planned a third counter-attack, having received five new battalions. Having failed in their first two attempts, the Ottomans were now entrenching opposite the Anzac firing line so that a distinct system of trenches became established. Preliminary moves were made on 30 April but the main counter-attack was launched on 1 May. The newly-arrived Marines
suffered the most under the attack but as with the two previous efforts, it was completely defeated. For the time being, Mustafa Kemal accepted he had insufficient resources to dislodge the invaders.
 A gap remained in the Anzac perimeter at the head of Monash Valley between the New Zealanders on the left along Walker's Ridge and Russell's Top and the Australian 4th Brigade holding the Posts along the second ridge (Quinn's, Courtney's and Steele's). The Ottomans held the Chessboard and the Nek and had a foothold on Russell's Top. From here they could fire into the back of Quinn's and the other posts. Therefore an attack was planned to extend the Anzac line to encompass Baby 700. After dusk on 2 May, the 16th and 13th Battalions of the 4th Brigade climbed the Bloody Angle, next to Quinn's, and attempted to establish a line along the Chessboard to Baby 700. They only managed to form a series of disjointed trenches along the foot of the Chessboard. The Otago
Battalion of the New Zealand Rifle Brigade was meant to capture the summit of Baby 700 but reached the front late by which time the Ottoman defences were aroused.
Only adjacent to Quinn's were the original objectives achieved. Elsewhere the positions gained were useless, being overlooked and exposed, offering no advantage to the Anzacs. With dawn on 3 May, most of the troops withdrew. Some of the 13th Battalion held out all day, abandoning their trenches that night. The debacle of the attack was compounded when the Nelson and Portsmouth Battalions of the RND were told to advance in support after dawn on 3 May, by which time the attack had clearly failed. In a move that gave "Dead Man's Ridge" its name, the Marines of the Portsmouth Battalion were led up that precipitous slope in full view of the Ottoman machine guns.
The attackers suffered about 1,000 casualties in this attack, only one of which was taken prisoner. The 16th Battalion had lost 338 men, over half its strength. The New Zealanders lost at least 324 men.
The Anzac battlefield had reached a stalemate. For General Hamilton, the Helles front was paramount and over the following months it would be the scene of a series of bloody engagements as the British and French edged imperceptibly closer to their first day objectives of Krithia and the hill of Achi Baba. The majority of reinforcements were directed to Helles, Anzac receiving only the dismounted Australian light horse and New Zealand mounted regiments.
Anzac was maintained as a threat to the Ottoman line of communications and a drain on their resources. When the British ceased offensive operations at Helles, Anzac provided the base from which to launch a new offensive in August in what became the Battle of Sari Bair
.
The reorganisation of the brigades of the Australian 1st Division following the reinforcement by the RND allowed a tally of the battalions to be made. In the period from 25 to 30 April, the casualties for each brigade are shown in the table.
Only one soldier of the 1st Division was taken prisoner in this period. Some of the missing were found to have been wounded and already evacuated. Most of the missing were dead. The New Zealand and Australian Division suffered about 2,000 casualties during the landing and consolidation phase. By 3 May, the casualty figure was about 8,500 including 600 from the Royal Naval Division. Of this figure, about 2,300 were killed in action or died of wounds.
Despite magnificent bravery by many Anzac, British and French soldiers, the Entente forces failed to achieve their objectives against an opponent they severely underestimated. Eventually the British Empire's greatest defeat up to that time would be overshadowed by British propaganda and the horror of the Western Front eclipsing the debacle at Gallipoli.
Amphibious warfare
Amphibious warfare is the use of naval firepower, logistics and strategy to project military power ashore. In previous eras it stood as the primary method of delivering troops to non-contiguous enemy-held terrain...
invasion of the Gallipoli Peninsula by Australian and New Zealand forces on 25 April 1915. The landing, north of Gaba Tepe on the Aegean
Aegean Sea
The Aegean Sea[p] is an elongated embayment of the Mediterranean Sea located between the southern Balkan and Anatolian peninsulas, i.e., between the mainlands of Greece and Turkey. In the north, it is connected to the Marmara Sea and Black Sea by the Dardanelles and Bosporus...
coast of the Peninsula, was made by soldiers of the Australian and New Zealand Army Corps and was the first significant combat of the war for these two countries. Another landing
Landing at Cape Helles
The landing at Cape Helles was part of the amphibious invasion of the Gallipoli peninsula by British and French forces on April 25, 1915 during the First World War. Helles, at the foot of the peninsula, was the main landing area. With the support of the guns of the Royal Navy, a British division...
was made several miles to the south west at Cape Helles by British and French troops.
The purpose of the invasion was to overtake the Ottoman forts that controlled the passage of the Dardanelles
Dardanelles
The Dardanelles , formerly known as the Hellespont, is a narrow strait in northwestern Turkey connecting the Aegean Sea to the Sea of Marmara. It is one of the Turkish Straits, along with its counterpart the Bosphorus. It is located at approximately...
straits. The Anzac Cove landing went awry when those members of the leadership cadre with the knowledge of the operational plan were either killed or evacuated wounded leaving the organisation at the beachhead in chaos and so, what was planned as a swift operation became a protracted and bloody eight-month struggle. In that period the frontline of the Anzac battlefield remained little changed from the ground captured on the first day of the landing, a space less than three-quarters of a square mile (2 km²) in size—home to over 20,000 men.
Winning control of the Dardanelles was originally intended to be a purely naval operation but after the loss of three battleship
Battleship
A battleship is a large armored warship with a main battery consisting of heavy caliber guns. Battleships were larger, better armed and armored than cruisers and destroyers. As the largest armed ships in a fleet, battleships were used to attain command of the sea and represented the apex of a...
s during the attack of 18 March it was decided that the aid of the army would be required to defeat the forts that guarded the straits. See Naval operations in the Dardanelles Campaign
Naval operations in the Dardanelles Campaign
The naval operations in the Dardanelles Campaign of the First World War were mainly carried out by the Royal Navy with substantial support from the French and minor contributions from Russia and Australia. The Dardanelles Campaign began as a purely naval operation...
.
The Mediterranean Expeditionary Force
Mediterranean Expeditionary Force
The Mediterranean Expeditionary Force was part of the British Army during World War I, that commanded all Allied forces at Gallipoli and Salonika. This included the initial naval operation to force the straits of the Dardanelles. Its headquarters was formed in March 1915...
was formed under General Sir Ian Hamilton
Ian Standish Monteith Hamilton
General Sir Ian Standish Monteith Hamilton GCB GCMG DSO TD was a general in the British Army and is most notably for commanding the ill-fated Mediterranean Expeditionary Force during the Battle of Gallipoli....
and a two-pronged landing on the peninsula was planned. The British 29th Division
British 29th Division
The British 29th Division, known as the Incomparable Division, was a First World War regular army infantry division formed in early 1915 by combining various units that had been acting as garrisons about the British Empire. Under the command of Major General Aylmer Hunter-Weston, the division...
would carry out the main landing at Cape Helles
Cape Helles
Cape Helles is the rocky headland at the south-westernmost tip of the Gallipoli peninsula, Turkey. It was the scene of heavy fighting between Turkish and British troops during the landing at Cape Helles at the beginning of the Gallipoli Campaign in 1915....
on the tip of the peninsula and advance along its length towards the forts at Kilitbahir which controlled the passage of the Narrows of the Dardanelles.
However, because it was not possible to land the entire force on the limited beaches at Helles, a secondary landing by the Australian (and) New Zealand Army Corps, north of Gaba Tepe on the Aegean coast, was planned. If resistance was strong, this secondary landing would be treated as a feint to draw defenders from Helles and the attacking force would be withdrawn. If successful, the attacking force would be a mere five miles (8 km) from the Narrows and in command of the high ground thereby denying the passage of reinforcements to Helles.
The Australian and New Zealand Army Corps (ANZAC) was formed in Egypt
Egypt
Egypt , officially the Arab Republic of Egypt, Arabic: , is a country mainly in North Africa, with the Sinai Peninsula forming a land bridge in Southwest Asia. Egypt is thus a transcontinental country, and a major power in Africa, the Mediterranean Basin, the Middle East and the Muslim world...
from the Australia
Australia
Australia , officially the Commonwealth of Australia, is a country in the Southern Hemisphere comprising the mainland of the Australian continent, the island of Tasmania, and numerous smaller islands in the Indian and Pacific Oceans. It is the world's sixth-largest country by total area...
n and New Zealand
New Zealand
New Zealand is an island country in the south-western Pacific Ocean comprising two main landmasses and numerous smaller islands. The country is situated some east of Australia across the Tasman Sea, and roughly south of the Pacific island nations of New Caledonia, Fiji, and Tonga...
infantry
Infantry
Infantrymen are soldiers who are specifically trained for the role of fighting on foot to engage the enemy face to face and have historically borne the brunt of the casualties of combat in wars. As the oldest branch of combat arms, they are the backbone of armies...
that had been in training prior to moving to the Western Front
Western Front (World War I)
Following the outbreak of World War I in 1914, the German Army opened the Western Front by first invading Luxembourg and Belgium, then gaining military control of important industrial regions in France. The tide of the advance was dramatically turned with the Battle of the Marne...
in France
France
The French Republic , The French Republic , The French Republic , (commonly known as France , is a unitary semi-presidential republic in Western Europe with several overseas territories and islands located on other continents and in the Indian, Pacific, and Atlantic oceans. Metropolitan France...
. When the need for infantry at Gallipoli arose, they were ideally placed to participate. Two divisions were formed; the Australian 1st Division containing the 1st, 2nd and 3rd Brigades, and the New Zealand and Australian Division
New Zealand and Australian Division
The New Zealand and Australian Division was formed at the start of the Battle of Gallipoli as a composite division under the command of New Zealand general Alexander Godley. At the start of World War I New Zealand had mustered insufficient infantry battalions to form their own division while...
containing the Australian 4th Brigade and the New Zealand Infantry Brigade.
Geography
Anzac Cove
Anzac Cove is a small cove on the Gallipoli peninsula in Turkey. It became famous as the site of World War I landing of the ANZAC on April 25, 1915. The cove is a mere long, bounded by the headlands of Ari Burnu to the north and Little Ari Burnu, known as Hell Spit, to the south...
itself is a shallow, nondescript stretch of beach about one kilometre wide, bounded by the headlands of Ari Burnu to the north and Hell Spit to the south.
The British planners identified three ridge lines as objectives for the invasion. The first ridge started above Ari Burnu at Plugge's Plateau (named later for Colonel A. Plugge of the Auckland
Auckland
The Auckland metropolitan area , in the North Island of New Zealand, is the largest and most populous urban area in the country with residents, percent of the country's population. Auckland also has the largest Polynesian population of any city in the world...
Battalion). The ridge continued via a perilously narrow stretch known as the "Razor's Edge" to a plateau called Russell's Top. A number of lesser spurs projected from Russell's Top towards the beach; the most prominent was a striking, eroded outcrop that was inevitably named "The Sphinx
Great Sphinx of Giza
The Great Sphinx of Giza , commonly referred to as the Sphinx, is a limestone statue of a reclining or couchant sphinx that stands on the Giza Plateau on the west bank of the Nile in Giza, Egypt....
" by soldiers who had until recently been encamped near the Pyramids of Giza. Neighbouring it to the north was Walker's Ridge which provided a direct, if exposed, route to the Top from the beach. Russell's Top was connected to the main range at Baby 700 via a narrow saddle known as "The Nek
Battle of the Nek
The Battle of the Nek was a small World War I battle fought as part of the Gallipoli campaign. "The Nek" was a narrow stretch of ridge in the Anzac battlefield on the Gallipoli peninsula. The name derives from the Afrikaans word for a "mountain pass" but the terrain itself was a perfect bottleneck...
". Baby 700 was so named because it and its neighbouring hill, Big 700 (later known as Battleship Hill), lay within the 600 feet (182.9 m) contour on the British maps. (Baby 700 is actually 590 feet (179.8 m) in height.)
John Monash
General Sir John Monash GCMG, KCB, VD was a civil engineer who became the Australian military commander in the First World War. He commanded the 13th Infantry Brigade before the War and then became commander of the 4th Brigade in Egypt shortly after the outbreak of the War with whom he took part...
. On the second ridge was one of the largest regions of level ground known as 400 Plateau (as it was bounded by the 400 feet (121.9 m) contour). It was a wide, heart
Heart
The heart is a myogenic muscular organ found in all animals with a circulatory system , that is responsible for pumping blood throughout the blood vessels by repeated, rhythmic contractions...
-shaped area of relatively level ground, thickly covered with scrub but largely treeless. The northern "lobe" of the plateau became known as "Johnston's Jolly", after Colonel Johnston, commander of the divisional artillery, who positioned guns opposite it with which, in the vernacular of the day, he could "jolly up" the Ottomans on the plateau. The southern "lobe" was distinguished by a solitary Turkish Pine
Turkish Pine
Pinus brutia, the Turkish pine, is a pine native to the eastern Mediterranean region. The bulk of its range is in Turkey, but it also extends to the East Aegean Islands of Greece, the Crimea, Iran, Georgia, Azerbaijan, northern Iraq, western Syria, Lebanon, and Cyprus...
tree, initially named the "Lonesome Pine", after a popular song of the time, but afterward shortened to Lone Pine
Battle of Lone Pine
The Battle of Lone Pine was a battle between Australian and Turkish forces that took place during the Gallipoli campaign from 6–10 August 1915. It was part of a diversion to draw attention from the main assaults of 6 August against the Sari Bair peaks of Chunuk Bair and Hill 971, which became...
. From this plateau, a number of lesser ridges projected towards the beach north of Gaba Tepe. The seaward ridge was Bolton's Ridge, the inland ridge, Pine Ridge.
The third ridge, known to the Anzacs as "Gun Ridge" and the Ottomans as Topçuluk Sirt (Artillery Ridge), because of some artillery
Artillery
Originally applied to any group of infantry primarily armed with projectile weapons, artillery has over time become limited in meaning to refer only to those engines of war that operate by projection of munitions far beyond the range of effect of personal weapons...
emplacements that were located there, stretched from Gaba Tepe to the main range at Chunuk Bair, above Battleship Hill. Between the second and third ridges lay Legge Valley.
Landing Plan
The landing would begin with the arrival of a "covering" force to swiftly capture the area surrounding the landing zone and make it secure for the main force. The Australian 3rd Brigade
Australian 3rd Brigade
The 3rd Brigade is a combined arms brigade of the Australian Army, based around the 1st, 2nd and 3rd Battalions of the Royal Australian Regiment . It was originally formed in 1914 for service during World War I, taking part in the fighting at Gallipoli and on the Western Front in Europe...
was selected as the covering force. Three battalion
Battalion
A battalion is a military unit of around 300–1,200 soldiers usually consisting of between two and seven companies and typically commanded by either a Lieutenant Colonel or a Colonel...
s were to seize the third ridge line as well as Gaba Tepe while the fourth battalion remained in reserve. Following the covering force, the Australian 2nd Brigade would land and move to the north, climbing to the summit of the main range at Hill 971 and protecting the left flank of the landing. The original plan called for the capture of Mal Tepe, halfway across the peninsula, on the first day but only if the landing was successful would this objective be pursued by the main force; the Australian 1st Brigade and the two brigades of the New Zealand and Australian Division.
The first wave of the covering force would come ashore from the cutters of three battleship
Battleship
A battleship is a large armored warship with a main battery consisting of heavy caliber guns. Battleships were larger, better armed and armored than cruisers and destroyers. As the largest armed ships in a fleet, battleships were used to attain command of the sea and represented the apex of a...
s which were to approach within three miles (5 km) of the shore. The remaining waves of the covering force would be landed from seven destroyer
Destroyer
In naval terminology, a destroyer is a fast and maneuverable yet long-endurance warship intended to escort larger vessels in a fleet, convoy or battle group and defend them against smaller, powerful, short-range attackers. Destroyers, originally called torpedo-boat destroyers in 1892, evolved from...
s which were to approach close in to the beach. The main force would land from transports.
The Landing
First wave
The first troops to land were two companies of each of the 9th, 10thAustralian 10th Battalion
The 10th Battalion was an infantry battalion of the Australian Army, which served as part of the Australian Imperial Force during World War I. The battalion was completely recruited from South Australia in August 1914 and together with the 9th, 11th and 12th Battalions, it formed part of the 3rd...
and 11th Battalions
Australian 11th Battalion
The Australian 11th Battalion was a World War I Australian Army unit. It was among the first infantry units raised for the 1st AIF during the First World War...
of the Australian 3rd Brigade
Australian 3rd Brigade
The 3rd Brigade is a combined arms brigade of the Australian Army, based around the 1st, 2nd and 3rd Battalions of the Royal Australian Regiment . It was originally formed in 1914 for service during World War I, taking part in the fighting at Gallipoli and on the Western Front in Europe...
. The companies embarked from three Formidable-class
Formidable class battleship
The Royal Navy's Formidable class battleships was an eight-ship class of pre-dreadnoughts designed by Sir William White and built in the late 1890s...
battleships; HMS Queen
HMS Queen (1902)
HMS Queen was a London or Queen class battleship, a sub-class of the Formidable class battleships of the British Royal Navy, and the tenth Royal Navy ship to bear the name.-Construction and design:...
, HMS London
HMS London (1899)
HMS London was a Formidable class battleship in the British Royal Navy, often considered to be part of the London class or subclass.-Technical Description:...
and HMS Prince of Wales
HMS Prince of Wales (1902)
HMS Prince of Wales was a London- or Queen-class predreadnought battleship, a sub-class of the Formidable-class battleships of the British Royal Navy...
. Each battleship dispatched four steamboats towing three row boats (launches and pinnaces)—a total of 48 boats.
The moon set at 3am and the battleships released the tows at 3.30am. Given the night was pitch dark, the tows headed due east and so relied on the battleships having been in the correct position when they were released. The journey of the tows became a shambles and numerous theories have been proposed to explain what went amiss. The southern-most tow kept a good course and was aimed correctly just north of Gaba Tepe but its commander found the neighbouring tows were heading northwards, leaving him isolated. He altered course to bring his tow closer and this may have caused a ripple effect as the other tows responded with a similar correction. As the shore was sighted, the headland of Ari Burnu became visible and some tows mistook this for Gaba Tepe and hence veered even further north.
For whatever reason, these first boats which were meant to land on a two mile (6 km) front between Hell Spit and Gaba Tepe ended up concentrated about Ari Burnu, 1.5 miles (2.4 km) north of their intended landing area—in fact, in the landing area of the 2nd Brigade which was to follow. The area about Ari Burnu was defended by a single company of the 2nd Battalion, 27th Regiment, Ottoman 9th Division. The Australians began to come ashore at 4.30am, the first man to land was Cpl. Joseph Stratford #1179. 9th Btn. According to eyewitness reports, when he was waist deep in water, he disposed of most of his heavy equipment and charged towards the enemy, which cut him down in a hail of bullets.
The first troops to land were met by sporadic rifle and machine gun
Machine gun
A machine gun is a fully automatic mounted or portable firearm, usually designed to fire rounds in quick succession from an ammunition belt or large-capacity magazine, typically at a rate of several hundred rounds per minute....
fire but casualties were relatively light. The 11th Battalion, which had landed just north of Ari Burnu, suffered the worst. The main enemy was confusion. The erratic course of the tows meant that the units had become intermingled. Officers were unsure where their units were or indeed where they themselves were; some thought that they had landed at Gaba Tepe. The geography was utterly unfamiliar and no objective could be identified.
Most of the troops of the 9th and 10th Battalions began to climb the first hill that confronted them, which unfortunately turned out to be the dead-end Plugge's Plateau.
Second wave
Australian 12th Battalion
The 12th Battalion was raised for the First Australian Imperial Force during the First World War. the battalion was recruited from South Australia, Tasmania and Western Australia and formed part of the 3rd Brigade, 1st Division....
Battalion (which was intended to be the brigade reserve), landed from seven destroyers; HMS Chelmer, HMS Colne
HMS Colne (1905)
HMS Colne was a River-class destroyer of the Royal Navy. She was built by John I. Thornycroft & Company, of Chiswick and launched on 21 May 1905. She was one of the Kennet subtype built by Thornycroft. She served in the Gallipoli Campaign during the First World War. She was sold in 1919....
, HMS Ribble, HMS Usk, HMS Foxhound, HMS Scourge and HMS Beagle. The destroyers had begun to move in at 4am and approached to within 500 metres of the shore before unloading their cargo into their boats. They too had moved too far to the north but were in places closer to the planned landing area—the Beagle unloaded south of Hell Spit on the intended beach, far enough south in fact that she came under machine gun fire from Gaba Tepe. The relatively short distance to travel meant that the battalions tended to land in the correct order and not become mixed as had happened with the first companies to land, however, with the element of surprise gone, the second wave was under constant fire.
Those units that did land to the south of the first wave's landing at Ari Burnu were confronted by gentler terrain than Plugge's Plateau and so, despite coming ashore 20 minutes after the first wave, they tended to make faster progress inland towards the second ridge. As was the case with the first wave, those of the second who landed north of Ari Burnu encountered heavy fire and suffered casualties both in the boats and on the shore.
To the north, some parties avoided the bottleneck on Plugge's and reached the extension of the first ridge at Russell's Top. One party, under the command of Captain Tulloch of the 11th Battalion, had followed the beach to the north and then ascended Walker's Ridge. There they encountered other parties from the 12th Battalion, one under Captain Lalor, which had scaled the cliff faces between Plugge's and the Sphinx.
The remainder of the Australian 1st Division (the 1st and 2nd Brigades) began to land from the transports between 5.30am and 7.30am. Boats from the transport Galeka, bearing about 140 men of the 7th Battalion
Australian 7th Battalion
The 7th Battalion was an infantry battalion of the Australian Army. Raised in 1914 as part of the Australian Imperial Force during the First World War, the battalion was completely recruited from Victoria and formed the 2nd Brigade, 1st Division. The battalion served during the Gallipoli campaign...
, made the most northerly landing of the day, opposite Fisherman's Hut. They were met by a withering fusillade from the Ottoman defenders and less than 40 men made it to the beach. Over the next night and day numerous attempts were made to recover the wounded from the exposed boats.
Ottoman reaction
At 6am, news of the landing reached the German commander of the Fifth Army, General Liman von SandersOtto Liman von Sanders
Generalleutnant Otto Liman von Sanders was a German general who served as adviser and military commander for the Ottoman Empire during World War I.-Biography:...
. He believed the Gaba Tepe landing was a feint and that the main blow would fall at Bulair, where the peninsula joins the Ottoman mainland. The demonstration by the Royal Naval Division in the Gulf of Saros, opposite Bulair, reinforced this belief. Von Sanders therefore retained two divisions, the 5th and the 7th, at Bulair, leaving the 9th and 19th divisions to deal with the Anzac and Helles landings. The reaction of the commander of the 9th Division was to send the two remaining battalions of the 27th Regiment (1st and 3rd) to reinforce the 2nd. Mustafa Kemal, commander of the Ottoman 19th Division which was in reserve only a few miles from the landing, was instructed to send a single battalion as well.
Baby 700
Battle of Chunuk Bair
The Battle of Chunuk Bair was a World War I battle fought between the Ottoman defenders and troops of New Zealand and Britain. Allied units that made the summit of Chunuk Bair early a.m...
. It also had a view straight down Monash Valley which was to become the main ANZAC base on the left.
Captain Tulloch led his force of about 60 men from Russell's Top across the Nek and, working around the inland side of Baby 700, began to drive the thin line of Ottoman defenders back up the ridge. Tulloch's small force managed to advance to a point just below the crest of Battleship Hill on the inland side. Here they were stopped by mounting Ottoman resistance to the front on Chunuk Bair and were threatened with outflanking from the seaward side of the hill. Tulloch therefore withdrew his force to Baby 700.
The Ottoman reinforcements had begun to arrive. The 1st Battalion of the 57th Regiment attacked along Mortar Ridge towards Baby 700 from the inland side. The 2nd Battalion had swung around behind Battleship Hill and advanced down the range on the seaward side of Baby 700.
Captain Lalor, aware that his 12th Battalion was meant to be in reserve and that the Nek was a vital defensive position, began to dig in on Russell's Top. At about 8.30am, having no sign of Tulloch's progress, Lalor decided to advance across the Nek onto Baby 700. The Australians took up positions on the far side of the summit and on the spur that led down towards the beach but were repeatedly forced to withdraw to the shelter of the near side. Five attempts were made to get across between 7.30am and 3pm.
Shortly after the landing, the commander of the 3rd Brigade, Colonel
Colonel
Colonel , abbreviated Col or COL, is a military rank of a senior commissioned officer. It or a corresponding rank exists in most armies and in many air forces; the naval equivalent rank is generally "Captain". It is also used in some police forces and other paramilitary rank structures...
Sinclair-MacLagan, had begun directing his forces on Plugge's Plateau to move up Monash Valley. The first companies were ordered to form strong posts on the second ridge, along the eastern face of the valley which was cut by steep, eroded ravines. These posts, which hung precariously from the lip of the valley wall, would come to be known as "Courtney's", "Steele's" and "Quinn's" Posts. Other forces from Plugge's were sent via Monash Valley towards Baby 700 but as fighting developed at the posts along the valley wall, these troops were repeatedly drawn off as reinforcements. Consequently, few additional troops would arrive to support those on Russell's Top as they attempted to capture and hold Baby 700. Around 10am MacLagan obtained reinforcements from the newly arrived 1st Brigade; one company from the 1st Battalion and two from the 2nd Battalion. The Auckland
Auckland
The Auckland metropolitan area , in the North Island of New Zealand, is the largest and most populous urban area in the country with residents, percent of the country's population. Auckland also has the largest Polynesian population of any city in the world...
and Canterbury
Canterbury, New Zealand
The New Zealand region of Canterbury is mainly composed of the Canterbury Plains and the surrounding mountains. Its main city, Christchurch, hosts the main office of the Christchurch City Council, the Canterbury Regional Council - called Environment Canterbury - and the University of Canterbury.-...
Battalions of the New Zealand Infantry Brigade, under the temporary command of Brigadier General
Brigadier General
Brigadier general is a senior rank in the armed forces. It is the lowest ranking general officer in some countries, usually sitting between the ranks of colonel and major general. When appointed to a field command, a brigadier general is typically in command of a brigade consisting of around 4,000...
H.B. Walker
Harold Bridgwood Walker
Lieutenant General Sir Harold Bridgwood Walker KCB, KCMG, DSO was an English general who led Australian and New Zealand forces during the First World War...
, an ANZAC staff officer, were also directed to Baby 700.
As the Ottomans also continued to reinforce, the position on Baby 700 deteriorated and became more untenable for the Anzacs whose flanks were in the air. They lacked sufficient machine guns and artillery support was non-existent since all Australian artillery that landed was ordered back into the ships. At about 4pm, the Ottoman 57th Regiment, now with the 3rd Battalion in support, mounted a concerted counter-attack on Baby 700. With the aid of artillery fire, they broke through the Anzac line forcing them to abandon the hill. The survivors retreated across the Nek or into Malone's Gully (on the seaward side of the Nek) and Monash Valley (on the inland side). A few became lost and ended up in the valley on the far side of the second ridge (Mule Valley) and were captured or killed.
One party under the command of Colonel Braund of the Australian 2nd Battalion was holding a line near the top of Walker's Ridge but Russell's Top was thinly held. During the night of 25 April, a small force of Ottomans from the 3rd Battalion, 57th Regiment, succeeded in infiltrating the line at the Nek and advancing along the Top, effectively splitting the left and right flanks of the Anzac firing line. The Ottomans withdrew from the Top before dawn, possibly encouraged by a naval bombardment.
400 Plateau
By this stage Colonel MacLagan had already decided to change the plan and hold a position on the second ridge. The 9th and 10th Battalions began to dig in across the plateau. His orders did not reach everyone. Isolated groups continued to push for the original objectives and were lost. As troops of the 2nd Brigade began to arrive, MacLagan made the fatal decision to advance the 9th Battalion, which had formed the semblance of a firing line across the middle of the plateau. By sections the Australians advanced and effectively vanished into the mounting Ottoman fire. MacLagan attempted to rescind the order shortly afterwards but by this time the battalion was dispersed. MacLagan convinced Colonel M'Cay
James Whiteside McCay
Lieutenant General Sir James Whiteside McCay KCMG, KBE, CB, VD was an Australian general and politician. A graduate of the University of Melbourne, where he earned Master of Arts and Master of Laws degrees, he established a successful legal practice, McCay & Thwaites...
of the 2nd Brigade to send his battalions, which had landed in some kind of order, forward into the plateau's void as well.
The day's fighting on 400 Plateau was confused. The thick scrub meant that men lying prone were invisible but unsighted and so it was nearly impossible to maintain contact with adjacent units. When standing up to move, the men were visible to the Ottoman defenders on the surrounding hills, thereby summoning a hail of gunfire and shrapnel. Lacking coherent organisation, small bands would advance, either following the original orders to reach the third ridge or new orders to reinforce the "firing line", wherever that was. The outcome was inevitably the same; they became detached, lost, pinned down and reduced by casualties.
By 1pm some semblance of a line had been re-established on 400 Plateau but it was thin and discontinuous. The 2nd and 3rd Brigades had been fully committed and the 1st Brigade battalions were now being led in to the fight. At 4.45pm, threatened by a Ottoman counter-attack, General Bridges
William Throsby Bridges
Major General Sir William Throsby Bridges KCB, CMG served with Australian forces during World War I, and was the first Australian to reach general officer rank...
, commander of the 1st Division, committed the last of the reserves, the 4th Battalion, on the plateau.
South of Lone Pine, the 8th Battalion had established a strong line on Bolton's Ridge which secured the southern flank of the landing. Major H.G. Bennett led 300 men of the 6th Battalion forward from Bolton's Ridge to Pine Ridge which extended south from Lone Pine and faced the third ridge across Legge Valley. Bennett was wounded in the wrist and forced to withdraw. When the Ottoman 27th Regiment counter-attacked around 17:00, the force Bennett had established on the Pine Ridge was surrounded and annihilated, the Ottomans taking no prisoners.
Consolidating the landing
Assessing the situation on the first night, the consensus reached within the Corps was to re-embark the troops and abandon the Anzac landing. This was partially motivated by a mistaken belief, garnered from over-optimistic Staff reports, that the Helles landing had been a success. The main concern was that the Anzacs were in no condition to withstand a major Ottoman counter-attack which everyone anticipated would occur the following morning. However, General Hamilton refused to evacuate the landing. To do so before dawn on the 26th would have been impossible anyway, as the transports and boats were scattered or damaged and those that were serviceable were engaged in loading the vast ranks of wounded men, lying on the beach. Hamilton concluded his order with:- You have got through the difficult business, now you have only to dig, dig, dig, until you are safe.
Near midnight, the men of the Australian Division received this blunt message from Birdwood: "Must organise entrenchments and hold on with all your might. Please complete entrenching scheme and link up fire trenches with those on right and left."
Dawn came and went on 26 April without a Ottoman attack. The Ottomans of the 9th and 19th Divisions were as exhausted as the Anzacs and had lost nearly as heavily in the first day's fighting. The fresh divisions with which an attack could have been made, the 5th and 7th Divisions, had been held at Bulair all day on the 25th.
The 26th was not without bloodshed for the Australians. In a tragic fiasco, the one battalion of the 1st Division that had survived the landing relatively unscathed, the 4th Battalion, made a general advance, marching north across 400 Plateau along no man's land
No man's land
No man's land is a term for land that is unoccupied or is under dispute between parties that leave it unoccupied due to fear or uncertainty. The term was originally used to define a contested territory or a dumping ground for refuse between fiefdoms...
. They were cut to pieces crossing Lone Pine. A few reached Johnston's Jolly where they sought shelter. The exact reason for the disaster was never determined but it seems that the 4th Battalion, expecting the ANZAC advance to resume at any time, had followed a movement on their left when General Bridges had instructed troops on Lone Pine to straighten their line.
At 2.30pm, the 57th Regiment attacked in six waves, advancing down Battleship Hill. In view of the British naval forces, the HMS Queen Elizabeth
HMS Queen Elizabeth (1913)
HMS Queen Elizabeth was the lead ship of the Queen Elizabeth-class of dreadnought battleships, named in honour of Elizabeth I of England. She saw service in both World Wars...
put six 15-in shells amongst the Ottoman lines, scattering them and breaking the attack. The Ottomans resumed the attack at the Nek under the cover of darkness but were driven off by 10pm. The 3rd Battalion of the Ottoman 72nd Regiment attempted to attack across the Chessboard against Pope's Hill but were caught in enfilading fire from a small Australian outpost near Quinn's. Elsewhere the Ottomans were able to get close, but not break into, the Anzac posts along the second ridge. At 11am a large force had advanced across Lone Pine towards the Australian line but were driven off by noon. After nightfall a Ottoman attack was made against Bolton's Ridge but, aided by field artillery guns firing over open sights, the attackers were held off, despite getting to within 25 yards (22.9 m) of the Australian trenches. For the time being, the Anzac landing was safe.
Stalemate
Portsmouth
Portsmouth is the second largest city in the ceremonial county of Hampshire on the south coast of England. Portsmouth is notable for being the United Kingdom's only island city; it is located mainly on Portsea Island...
and Deal
Deal, Kent
Deal is a town in Kent England. It lies on the English Channel eight miles north-east of Dover and eight miles south of Ramsgate. It is a former fishing, mining and garrison town...
Battalions of the Royal Marine Brigade and the Nelson Battalion of the 1st Royal Naval Brigade. These were sent in along the second ridge and 400 Plateau to relieve the Australian 1st and 3rd Brigades which had been under constant pressure since the landing. The relieved brigades attempted to reorganise on the beach.
Meanwhile Mustafa Kemal planned a third counter-attack, having received five new battalions. Having failed in their first two attempts, the Ottomans were now entrenching opposite the Anzac firing line so that a distinct system of trenches became established. Preliminary moves were made on 30 April but the main counter-attack was launched on 1 May. The newly-arrived Marines
Royal Marines
The Corps of Her Majesty's Royal Marines, commonly just referred to as the Royal Marines , are the marine corps and amphibious infantry of the United Kingdom and, along with the Royal Navy and Royal Fleet Auxiliary, form the Naval Service...
suffered the most under the attack but as with the two previous efforts, it was completely defeated. For the time being, Mustafa Kemal accepted he had insufficient resources to dislodge the invaders.
Otago
Otago is a region of New Zealand in the south of the South Island. The region covers an area of approximately making it the country's second largest region. The population of Otago is...
Battalion of the New Zealand Rifle Brigade was meant to capture the summit of Baby 700 but reached the front late by which time the Ottoman defences were aroused.
Only adjacent to Quinn's were the original objectives achieved. Elsewhere the positions gained were useless, being overlooked and exposed, offering no advantage to the Anzacs. With dawn on 3 May, most of the troops withdrew. Some of the 13th Battalion held out all day, abandoning their trenches that night. The debacle of the attack was compounded when the Nelson and Portsmouth Battalions of the RND were told to advance in support after dawn on 3 May, by which time the attack had clearly failed. In a move that gave "Dead Man's Ridge" its name, the Marines of the Portsmouth Battalion were led up that precipitous slope in full view of the Ottoman machine guns.
The attackers suffered about 1,000 casualties in this attack, only one of which was taken prisoner. The 16th Battalion had lost 338 men, over half its strength. The New Zealanders lost at least 324 men.
Aftermath
| Unit | Killed | Wounded | Missing | Total |
|---|---|---|---|---|
| 1st Brigade | ||||
| HQ | 2 | 2 | ||
| 1st Bn | 39 | 214 | 175 | 428 |
| 2nd Bn | 44 | 251 | 155 | 450 |
| 3rd Bn | 40 | 194 | 81 | 315 |
| 4th Bn | 28 | 95 | 67 | 190 |
| 1 Bde total | 153 | 754 | 478 | 1,385 |
| 2nd Brigade | ||||
| 5th Bn | 30 | 259 | 221 | 510 |
| 6th Bn | 34 | 165 | 212 | 411 |
| 7th Bn | 70 | 244 | 227 | 541 |
| 8th Bn | 24 | 144 | 51 | 219 |
| 2 Bde total | 158 | 812 | 711 | 1,681 |
| 3rd Brigade | ||||
| HQ | 1 | 1 | ||
| 9th Bn | 32 | 240 | 243 | 515 |
| 10th Bn | 50 | 232 | 184 | 466 |
| 11th Bn | 34 | 190 | 154 | 378 |
| 12th Bn | 73 | 239 | 193 | 505 |
| 3 Bde total | 189 | 902 | 774 | 1,865 |
| Total | 500 | 2468 | 1963 | 4931 |
The Anzac battlefield had reached a stalemate. For General Hamilton, the Helles front was paramount and over the following months it would be the scene of a series of bloody engagements as the British and French edged imperceptibly closer to their first day objectives of Krithia and the hill of Achi Baba. The majority of reinforcements were directed to Helles, Anzac receiving only the dismounted Australian light horse and New Zealand mounted regiments.
Anzac was maintained as a threat to the Ottoman line of communications and a drain on their resources. When the British ceased offensive operations at Helles, Anzac provided the base from which to launch a new offensive in August in what became the Battle of Sari Bair
Battle of Sari Bair
The Battle of Sari Bair , also known as the August Offensive, was the final attempt made by the British in August 1915 to seize control of the Gallipoli peninsula from the Ottoman Empire during First World War.The Battle of Gallipoli had raged on two fronts, Anzac and Helles, for three months since...
.
The reorganisation of the brigades of the Australian 1st Division following the reinforcement by the RND allowed a tally of the battalions to be made. In the period from 25 to 30 April, the casualties for each brigade are shown in the table.
Only one soldier of the 1st Division was taken prisoner in this period. Some of the missing were found to have been wounded and already evacuated. Most of the missing were dead. The New Zealand and Australian Division suffered about 2,000 casualties during the landing and consolidation phase. By 3 May, the casualty figure was about 8,500 including 600 from the Royal Naval Division. Of this figure, about 2,300 were killed in action or died of wounds.
Despite magnificent bravery by many Anzac, British and French soldiers, the Entente forces failed to achieve their objectives against an opponent they severely underestimated. Eventually the British Empire's greatest defeat up to that time would be overshadowed by British propaganda and the horror of the Western Front eclipsing the debacle at Gallipoli.